Monday 31 January 2011

Post 2 of 2 Last 2 batches of xmas cards


As promised, back again folks with the last two cards to show you.

Yet again, rectangle cards, 2 different coloured card stocks per card, 2 co ordinating backing papers per card, gem stones, sentiments, cuttlebug, spellbinders shapes oval, ornate oval , tags and some lovely images coloured with whispers pens.
I do so hope you like this ones and is a great layout for quick and easy cards. Until next time do take care and happy crafting, lol

Post 1 of 2 - last 2 batches of xmas cards


Hi Folks,

At last I have finally completed all the xmas cards that I started while we had the lovely white stuff and am feeling much better but going to have a rest tomorrow so as not to start my back off again.
Think I'll had done with my fleece blanket and lavender scented pillow with a few feel good movies, maybe Calmatity Jane or French Kiss then again maybe the lovely Letters to Juliet, big softie here.

I have picked a couple from each batch to show you, I have used rectangle cards, 2 different coloured cards stocks per card, 2 co ordinating backing papers per card, ribbon, sentiments, gem stones and some lovely images coloured with whispers pens.

Off to post the final ones, be back shortly, lol

Saturday 29 January 2011

Evening Purse


Hi Folks,

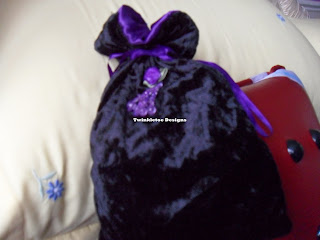
As promised a little something that I have been working on for one of my lovely niece's as its her birthday shortly. I thought I would make her a little evening bag/purse as she goes out to the under 18's nightclub every so often and I thought it would go greatly with that little black dress.

Here is the info to make this item.
Cutting out. Cut four rectangles of fabric measuring 28x23cm (11x 9inc). If you are using a contrast lining, cut two from the lining and two from the outer fabric ( I have used black velour and purple lining).

Marking the casing. Layout the two main fabric rectangles with the wrong sides up. On each long side, measure and mark 6cm (21/4 inc) and 8cm (31/4in) down from one short edge - this short edge becomes the top edge of the bag. On a patterned fabric make sure the pattern is going in the right direction.

Stitching the outer bag. Place the main fabric rectangles right sides together. Stitch down one side seam to the first casing mark and backstitch. Start stitching again at the second casing mark, securing the stitching by backstitching, and stitch to the base edge. Repeat, for the other side seam. Stitch across the base. Press the side seams open.

Stitching the lining. Place the two lining fabric rectangles together, right sides facing. Stitch both side seams completely and across the lower edge, leaving a 7.5-10cm (3-4 inc) gap. Press the side seams open.

Assembling the bag. Turn the outer bag right side out. Slip the lining over the outer bag, right sides together and matching top raw edges. Stitch all the way round the top edge of the bag.

Turning the bag. Pull the outer bag through the opening in the lining. Slipstitch the gap in the lining closed and push it down inside the bag. Finger roll the top edge flat and press.

Stitching the casing. To draw guidelines for the casing, use tailor's chalk to mark all the way round the bag in line with the top and bottom of casing openings. Slip bag over the free arm of your machine. Stitch along both lines through both the outer bag and the lining.

Adding the drawstrings. Cut two 60cm (24inc) lengths of cord and thread one through one hole, all the way round the casing and out again. Repeat to thread the other piece through the hole on the opposite side and back again. Thread a tassel over each cord (optional). Knot the cords and adjust them so that the knots are hidden inside the casing.

Embellish as you wish or not. I do hope you like this and that you might give it a go and you dont need a sewing machine as I did not use one, until next time do take care and happy crafting, lol

Thursday 27 January 2011

Post 2 of 2 - More Xmas Cards


Hi Again Folks,

Here is the next batch of cards completed, I have used a layout that I do love from another crafting member on the docrafts site, I love it so much that I use it as much as I possibly can.
I have used rectangle cards, 2 coloured card stocks per card, 1 backing paper per card, 1 ribbon, sentiments, cuttlebug, spellbinders shapes oval and ornate oval, marianne D creatable ribbon slider and some stamped images.

I do so hope you like these and there is two more batches to come hopefully soon but do have another project on the go which I need first as its going to be a gift but am also trying to take it a bit easier than normal.

So until next time, do take care of yourselves and happy crafting, lol

Post 1 of 2 - More Xmas Cards


Hi Folks,

Gradually getting back to normal with my back and have been doing a little catching up with the cards I started while we had all that lovely white stuff, I still do have 2 more batches to complete but am getting there at least.

I have used another one of Loretta's challenge layouts for this batch of ten but have chosen three to show you. I have used rectangle cards, two coloured cards stocks per card, 2 co ordinating backing papers per card, ribbon, sentiments, images, cuttlebug, spellbinders scallop and ornate scallop die cuts.

I have not used any embellies as was concerned it would be a little overdown otherwise. Off to post the last batch for today, lol

Monday 24 January 2011

LMC No 109


Hi Folks,

I hope this finds you all well, sorry not around much do have lots of cards in various stages, just flipping difficult to work with my back hurting so much so am trying to rest as much as possible and do just a little at a time, so please forgive me, hopefully will be back fighting fit shortly, fingers crossed.

I have managed to make 2 cards for this challenge, 1 is a valentines card for my hubbie and the other is a birthday card.
I have used white card stock to make the square cards, different shades of pink card stock, 2 different backings papers one with butterflies and the other with hearts etc. I have also used various flowers, gem stones, sentiments, 3 ribbons (2 for the birthday card), cuttlebug, embossing folder lovers lane, 2 different images coloured with whispers pens.

Rather a good layout this challenge, certainly got my ole grey cell working and do so hope you like the cards and until next time, hopefully not too long, do take care of yourselves and happy crafting, lol

Saturday 8 January 2011

LMC No 108


Well Hello again Folks,

Did not expect to be back with another blog so soon after the other 3 but I managed yesterday to get in a bit more crafting to do Loretta's Challenge, so here goes.

I have used a rectangle card, 2 different colours of card stock, 2 co ordinating backing papers, ribbon, buttons, sentiments, brads, flowers and the lovely Daisy image which I so adore.

I am rather pleased with the whole effect of this card, rather a delight and very girlie and makes me think of long hazy summer days, ohhhhh yes please.

Until next time do take care and happy crafting, lol

Thursday 6 January 2011

Post 3 of 3


Here's the third and final post of the day and week folks.

I have used white card stock to make the square cards, two co ordinating backing papers, 2 different coloured card stocks, cuttlebug, spellbinders scallop, flowers/gems/snowflakes, sentiments and images.

I do hope you like these, also as I say there will be more to follow as and when I get to complete them, so until next time do take care and happy crafting, lol

Post 2 of 3


Here's the second post of the day folks.

I have used rectangle cards for this batch with two co ordinating backing papers per card, plus different coloured card stock papers, cuttlebug, spellbinders scallops, ribbon, sentiments, flowers/snowflakes, gems and images.

Off to the next batch, see you shortly

Post 1 of 3


Hi Folks,

Hope the New Year finds you all well, certainly have been busy here especially after all the snow we have had in the last couple of months I have kept myself occupied by making loads and loads of Christmas cards which are in various stages of completion. I have managed to finish 40 of them off this week which are in 3 batches due to the layouts, still more to finish though. I have choosen 3 cards from each batch to show you.

I have used rectangle cards for this batch with two co ordinating backing papers per card, 2 different sets of card stock per card, sentiments, flowers, buttons and an image per card.

Off to the next batch, see you shortly

Saturday 1 January 2011

Happy New Year

Hello Everyone,

Just popped in quickly to wish everyone a Happy New Year and I hope its going to be a great one for you all, see you all soon, lol xx